A well-organized workspace significantly enhances project efficiency. Effective tool organization transforms tasks, saving valuable time and reducing common frustrations.
Nothing kills workshop productivity like having to hunt for missing tools.
An efficient setup ensures every tool is readily available. This unlocks the secrets to a highly productive work environment for all your Tool Boxes.
Key Takeaways
- Declutter your toolbox first. Remove all broken or unused tools. This makes space for important items.
- Group your tools. Put similar tools together, like all wrenches or all screwdrivers. You can also group tools by project type.
- Use vertical space. Hang tools on magnetic strips or pegboards. This keeps your workbench clear.
- Make custom spots for tools. Use foam inserts or drawer dividers. This stops tools from moving around and getting damaged.
- Keep small parts organized. Use clear boxes for screws and nails. Small bins keep washers separate.
- Label everything clearly. Label drawers and compartments. This helps you find tools fast.
- Use drawer liners. They stop tools from sliding. Liners also protect your toolbox from scratches.
- Clean your toolbox regularly. Do a quick tidy-up often. Do a deep clean once a year. This keeps your tools in good shape.
Declutter Your Tool Boxes: The Essential First Step
Effective organization begins with a thorough decluttering process. This crucial first step lays the foundation for an efficient and functional workspace. Skipping this stage often leads to reorganizing existing clutter, which defeats the purpose of creating an optimized system. A systematic decluttering approach ensures that only necessary and functional tools remain.
Empty and Evaluate Every Item
Remove All Contents
Begin by completely emptying all tool storage units. This includes every drawer, compartment, and tray. Place all tools and accessories onto a large, clean surface, such as a workbench or a tarp on the floor. This provides a clear overview of the entire collection. Seeing everything laid out helps individuals recognize duplicates and items they no longer use.
Discard Broken or Unused Tools
With all items visible, individuals must evaluate each tool. Ask critical questions about every piece. Has anyone used this item in the past year? Does it add value to the work environment? Discarding broken tools prevents the frustration of finding a non-functional item when a working one is needed. This action also significantly reduces overall clutter. Similarly, minimizing duplicate tools, especially those not needed for different workstations, prevents wasted time and money. People often re-purchase items simply because disorganization makes them seem lost.
Tip: When evaluating items, consider their usefulness, condition, and current purpose. Discard items that no longer fit, function properly, or bring value to your projects.
Assess Your Current Tool Collection
Identify Frequently Used Tools
After removing broken or unused items, identify the tools used most often. These are the workhorses of any project. Consider which tools consistently appear on the workbench or are always within arm’s reach during tasks. These frequently used items deserve prime real estate in the organized system.
Group Similar Tools Together
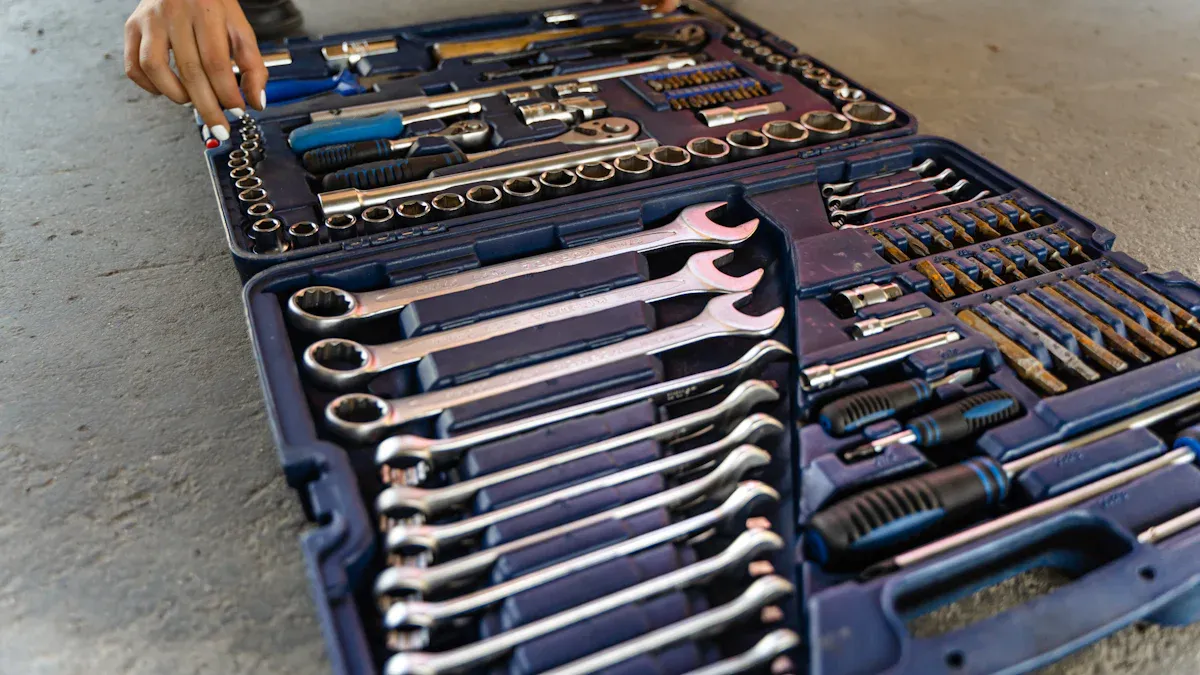
Begin the initial sorting process by grouping similar tools. Place all wrenches together, all screwdrivers in one pile, and all pliers in another. This preliminary grouping helps visualize the volume of each tool type. It also prepares the collection for more refined categorization within the Tool Boxes. This step simplifies the subsequent organization phases.
Categorize for Clarity: Smart Grouping in Your Tool Boxes
After decluttering, the next step involves categorizing tools for clear identification and efficient retrieval. Strategic grouping ensures every item has a designated place, minimizing search time during projects. This systematic approach enhances overall workflow.
Logical Grouping Strategies
Effective organization relies on logical grouping methods. These strategies help maintain order and improve accessibility.
Organize by Tool Type (e.g., wrenches, screwdrivers)
One common and highly effective method involves grouping tools by their type. This means placing all wrenches together, all screwdrivers in a separate section, and all pliers in another. For example, technicians often group sockets, wrenches, and power tools into specific drawers or sections. This approach allows for quick identification. Tools can also be arranged by size, from smallest to biggest, for even faster retrieval.
| Grouping Strategy | Description |
|---|---|
| By tool type | Grouping together sockets, wrenches, and power tools into specific drawers or sections. |
| By size | Arranging tools by their size for quick identification and retrieval. |
Group by Project Type (e.g., electrical, plumbing)
Another valuable strategy involves grouping tools by the type of project they serve. For individuals who frequently undertake specific tasks, such as electrical work or plumbing repairs, creating dedicated kits for these projects can save considerable time. This method ensures all necessary tools for a particular job are together, ready for immediate use.
The “Keep or Store Elsewhere” Rule
Not every tool needs to reside in the primary Tool Boxes. Applying the “Keep or Store Elsewhere” rule helps prioritize essential items.
Prioritize Essential Tools for Your Tool Boxes
Individuals should reserve prime space in their main Tool Boxes for frequently used items. These are the tools that see daily or weekly action. Placing the most frequently used tools front and center ensures quick accessibility. This method, often used in aviation and professional maintenance, places frequently used items in top drawers and less common items in lower storage. This strategy ensures that only necessary or useful items for current work remain in the immediate work area.
Solutions for Seldom-Used Tools
Tools used infrequently do not require prime real estate. For these items, consider alternative storage solutions. If an item is needed by the company but not immediately, store it. Ensure a specific plan exists for its future retrieval. Seldom-used tools can reside in harder-to-reach spots, such as higher shelves or dedicated storage bins. An annual decluttering process helps review all belongings. During this review, individuals can sell, donate, or discard items no longer needed. This prevents clutter from accumulating in primary storage areas.
Maximize Vertical Space: Innovative Tool Boxes Solutions
Optimizing vertical space significantly enhances tool organization. This strategy moves tools off workbenches and floors, creating a more efficient workspace. Wall-mounted racks and slatwall systems are excellent examples. These systems keep tools and even heavy Tool Boxes off the ground, providing easy access and a clean setup. Slatwall systems, with their grooved panels, offer extensive customization. Users can snap on hooks, baskets, or shelves, allowing quick reconfiguration for diverse items.
Magnetic Strips and Bars
Magnetic strips and bars offer a simple yet powerful solution for vertical tool storage. They secure metal tools directly to a wall or workbench side.
Secure Metal Tools for Easy Access
Magnetic strips provide a secure spot for metal tools. This prevents accidents from falling tools or items being stepped on. Users eliminate the risk of cuts by making tools visible and within reach. This reduces the need for hazardous searching. For installation, users first clean the mounting surface. This ensures better adhesion. For a more secure setup, consider using screws or additional mounting hardware. Position the strip at a height that allows easy tool access. This also keeps tools out of reach of small children. Regularly check the strip’s surface for metal shavings or dust. This buildup can reduce holding capacity. Clean the strips with a damp cloth and mild detergent.
Utilize for Frequently Used Items
Strategically placing magnetic strips on unused wall spaces frees up drawer and counter space. This turns vertical areas into functional tool storage zones. Users group tools by type or frequency of use for efficient organization. Hanging frequently-used tools on accessible strips streamlines workflow. This improves efficiency and reduces search time. Test the strip’s strength by gradually adding tools. This determines its holding capacity and prevents sagging.
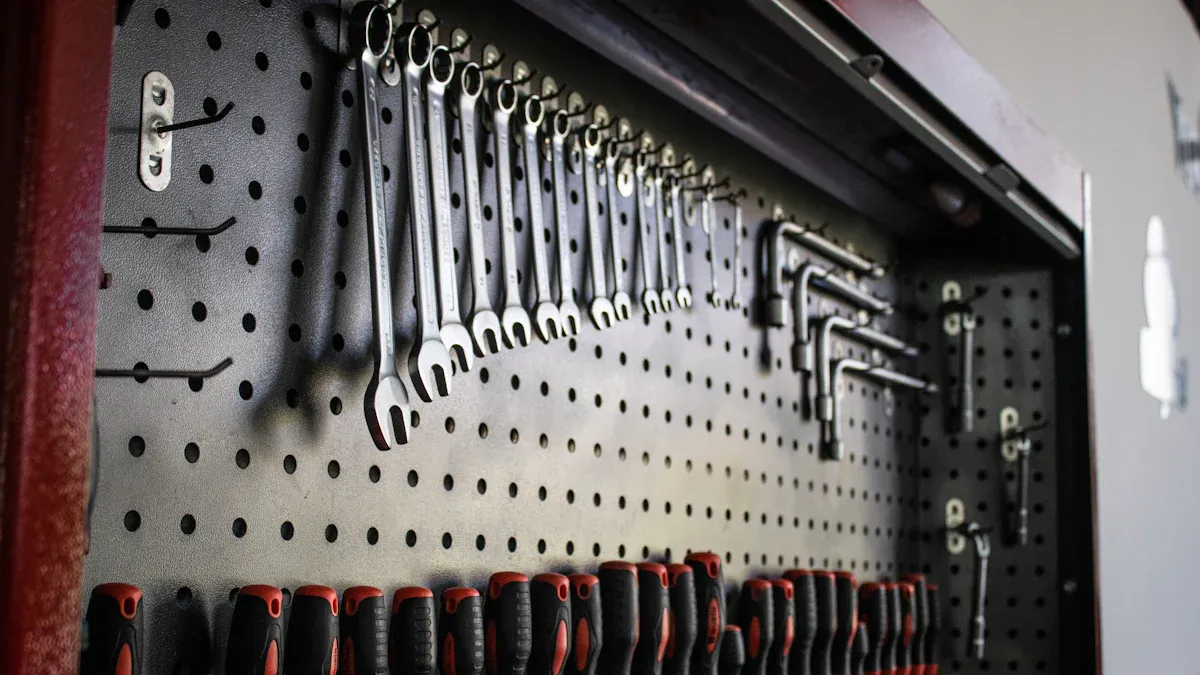
Pegboards and Hooks
Pegboards are a classic and highly versatile solution for maximizing vertical space. They offer extensive customization for various tools.
Hang Tools for Visibility and Accessibility
Pegboards effectively utilize vertical wall space. This frees up workbench and floor areas, especially beneficial in smaller workshops. Tools are openly displayed, making them easy to locate at a glance. This reduces search time and promotes an efficient workflow. Designated spots also encourage tidiness. Pegboards can store a wide array of tools, from hand tools to power tools. They are versatile and can be customized to fit specific needs.
Customize Layouts for Different Tool Boxes
The layout of hooks, shelves, and bins on a pegboard is highly customizable. Users arrange them to suit individual tools and workflows. The system easily expands as tool collections grow. This makes pegboards a cost-effective and durable long-term solution. Modern pegboard hooks often feature secure locking mechanisms. These hooks stay firmly in place, preventing disorganization and potential safety hazards from falling tools. A universal baseplate system allows for easy swapping of hooks with other attachments. This enables flexible customization for various organizational needs.
Custom Fit: Foam Inserts and Dividers for Your Tool Boxes
Custom-fit solutions significantly enhance tool organization. Foam inserts and adjustable dividers create dedicated spaces for each item. This approach prevents tools from shifting and protects them from damage. It also ensures every tool has a specific home, streamlining workflow.
DIY Foam Cutouts
DIY foam cutouts offer a personalized organization solution. They provide a snug fit for individual tools.
Trace and Cut for Perfect Tool Fit
Creating custom foam inserts involves precise tracing and cutting. Users can trace tool outlines onto paper, then scan and convert these to vector formats for accuracy. Alternatively, placing tools directly on a flatbed scanner works, though it may require adjustments. For simple shapes, measuring tools with rulers or calipers and drawing outlines in software is effective. Materials like polyethylene (PE) foam, often found in camping pads, or ethylene-vinyl acetate (EVA) foam, available as interlocking tiles, serve as cost-effective options. For cutting, a laser cutter provides clean, precise results, especially for complex shapes. Manual cutting with an X-Acto knife or scalpel is also possible, but it requires more effort for clean edges. For thicker inserts, laminating thinner foam layers with 3M Super 77 spray adhesive works well. A Dremel tool can carve varying depths into foam, creating a very custom and snug fit for tools.
Protect Delicate Tools from Damage
Foam inserts offer superior protection for tools. Thick foam, especially layered sheets, cushions tools from the bottom and prevents them from sitting too low in drawers. This protection reduces rattling and potential damage during transport or drawer movement. Bright, contrasting colors in foam inserts immediately show if a tool is missing, improving tool control. Tool-shaped spaces enable anyone to quickly put tools away, ensuring tools return to the correct location and stay in order by size. This also prevents tools from rolling and sliding when drawers close. Adding small labels next to each tool’s cutout helps users find and return tools faster.
Adjustable Drawer Dividers
Adjustable drawer dividers provide flexible organization within tool storage units. They adapt to changing needs.
Create Custom Compartments in Tool Boxes
Adjustable dividers allow users to create custom compartments of various sizes. These dividers, often manufactured from durable materials like military-grade aluminum, fit precisely within drawers. They include removable separators, allowing users to adjust for different part sizes. A typical set might include two center dividers and two side dividers, creating three sections of equal width. Thin strips of foam scraps can also serve as vertical dividers, organizing small items like screws or nails within drawers. This maximizes space and keeps small components sorted and visible.
Prevent Tool Migration and Clutter
Dividers are essential for preventing tool migration. They keep parts separated and organized, ensuring items remain in their designated sections even when drawers open and close. This organized structure significantly reduces clutter. It also saves time by eliminating the need to search through jumbled tools. Maintaining order within compartments demonstrates professionalism and pride in work.
Small Parts, Big Solutions: Containment in Your Tool Boxes
Organizing small components presents a unique challenge within any workspace. Loose screws, nails, washers, and connectors can quickly create clutter and lead to lost time. Effective containment solutions ensure these tiny but crucial items remain sorted, visible, and readily accessible. This approach significantly streamlines project execution and enhances overall efficiency.
Clear Lidded Organizers
Clear lidded organizers offer an excellent solution for managing small parts. Their design provides both protection and immediate visual access.
Store Screws, Nails, and Fasteners
These organizers prove ideal for storing various small items such as screws, nails, and fasteners. They accommodate a wide range of items, from craft supplies to small electronics, making them highly versatile for diverse needs. Manufacturers construct them from high-quality materials, ensuring durability and resistance to daily wear and tear. This robust construction securely stores items, protecting them from loss or damage.
Quick Identification of Contents
The transparent nature of clear lidded organizers allows for easy identification of stored items. Users can view contents without opening the container, eliminating the need to rummage through multiple boxes. This feature offers significant time-saving convenience, especially in busy environments where quick access is paramount. The clear view also makes inventory management effortless, ensuring timely replenishment of supplies before they run out. Their smooth surfaces also make them easy to clean, helping to maintain hygiene standards within the workspace.
Small Parts Bins and Trays
Small parts bins and trays provide another effective method for organizing numerous small components. These solutions offer both robust storage and convenient accessibility.
Keep Washers and Connectors Separate
These bins and trays are particularly useful for keeping items like washers and connectors separate. Storage bins with drawers offer convenient access to items, allowing users to pull out only what they need. Their durable construction withstands heavy use, making them suitable for demanding professional environments. They prevent mixing, which saves considerable time during assembly or repair tasks, ensuring parts remain distinct.
Stackable Options for Space Efficiency
Many small parts bins and trays feature stackable designs. These modular units optimize vertical space, allowing for custom storage systems that adapt to evolving needs. Stackable drawers offer a customizable layout and a significant space-saving design, crucial for compact workspaces. Their stackable nature maximizes storage space and minimizes clutter, promoting a safer and more organized environment. Adjustable dividers within these units provide flexibility to adapt to different part sizes and quantities. Lightweight units with handles also allow for easy transport of tools from a vehicle to a job site, enhancing portability and convenience for professionals on the go. These features make them a practical choice for any organized Tool Boxes.
Label Everything: Quick Retrieval from Your Tool Boxes
Effective labeling transforms a tool storage system into an efficient retrieval hub. Clear identification of contents significantly reduces search time and enhances overall productivity. A well-labeled system ensures every tool has a designated home, making both retrieval and return effortless.
Clear and Concise Labeling
Precise labeling is fundamental for any organized workspace. It provides immediate clarity regarding the location of specific items.
Label Drawers and Compartments
Labeling sections and tools within a toolbox, especially with foam inserts and on the outside of drawers, significantly improves the ease of finding equipment and quickly returning it to its place. This practice also helps in faster identification of contents within drawers, ultimately saving time that would otherwise be spent searching. Technicians can quickly locate the exact wrench or screwdriver needed, minimizing project delays.
Use Permanent Markers or Label Makers
Several effective methods exist for clear and concise labeling.
- Some users prefer no labels, relying on memory to locate tools, especially in smaller setups.
- Electrical tape and a Sharpie offer a cheap, easy, and residue-free labeling method that allows for frequent changes.
- P-touch labelers are mentioned, but concerns exist about labels falling off or leaving residue over time.
- Magnetic labels work well for steel drawer fronts, while labels printed on clear tape suit other drawer types, particularly in extensive tool collections.
Color-Coding Systems
Color-coding adds another layer of visual organization, allowing for even faster identification and sorting.
Visual Cues for Tool Categories
Assigning specific colors to drawers or cabinets for different tool categories allows for faster identification of where tools belong and where to retrieve them. For example, a system might look like this:
| Tool Category | Drawer Color | Label Example | Typical Tools Stored |
|---|---|---|---|
| Fasteners | Orange | Screws & Bolts | Hex bolts, lag screws, drywall nails |
| Power Tools | Blue | Corded Tools | Drills, jigsaws, angle grinders |
| Measuring Tools | Green | Precision Equipment | Levels, calipers, squares |
Using colored adhesive vinyl, colored handles, or drawer inserts helps visually reinforce the designated purpose of each storage area. Implementing bold, bright colors like neon yellow or orange for high-usage tool drawers makes frequently needed items easy to locate. Utilizing transparent fronts with colored outlines or magnetic strips with colored tool silhouettes on wall space above the workbench further enhances quick tool identification.
Streamline Workflow in Your Tool Boxes
Color-coding significantly streamlines workflow. It offers enhanced visual clarity, making it easier to spot needed items at a glance. This system improves sorting, helping individuals quickly categorize and sort items. A visually organized space reduces stress, leading to a calmer mindset. Ultimately, color-coding increases productivity by saving time searching for items, leading to a more efficient working environment. Color coding on tool boards or in drawers communicates tool types and immediately signals when tools are missing. Shadowing techniques, using vinyl shadow board tape on pegboards or two-color foam inserts in drawers, show the exact location for each tool and highlight missing items with a bright contrasting color. Color coordination creates distinct areas for different tool types, helping users quickly find tools and notice misplacement.
Drawer Liners: Protection and Stability for Tool Boxes
Drawer liners offer significant advantages for maintaining an organized and protected workspace. They provide a crucial layer of defense for storage units while enhancing tool stability. Implementing drawer liners transforms a standard storage unit into a highly functional system.
Non-Slip Drawer Liners
Non-slip drawer liners are essential for preventing tool movement and safeguarding storage surfaces. They create a stable environment for all stored items.
Prevent Tools from Shifting
These liners keep items securely in place, preventing tools from shifting or sliding during drawer operation. This stability is vital for maintaining organization and preventing damage. ToolBox Widget’s Premium Drawer Liners, crafted from high-quality PVC rubber and foam material, feature a textured non-slip surface. This surface keeps tools securely in place. Similarly, ToolTex Premium Tool Box Liners, made from a tough proprietary synthetic rubber material, also feature a textured anti-slip surface. They are anti-crinkle, further ensuring tools remain stationary.
Protect Tool Box Surfaces
Drawer liners protect storage surfaces from scratches, stains, and spills. They act as a barrier against the wear and tear of daily use. ToolBox Widget’s Premium Drawer Liners provide robust protection against dents, scratches, and everyday wear and tear. ToolTex Premium Tool Box Liners are 0.08 inches thick and puncture-resistant. They are strong enough to withstand heavy and sharp tools, offering superior protection for the underlying surfaces.
Cushioning for Delicate Tools
Beyond preventing movement, liners also provide essential cushioning, reducing the risk of damage to sensitive equipment.
Reduce Rattling and Damage
Foam inserts are highly effective for protecting delicate tools. They allow tools to sit snugly in padded cutouts, preventing rattling and scratching. This makes them ideal for sensitive equipment like torque wrenches, calibration instruments, and electronics, especially when tools are frequently moved. For optimal tool protection, foam is considered hard to beat. Different foam types offer varying levels of protection and durability:
| Foam Type | Key Characteristics |
|---|---|
| Polyethylene (PE) Foam | Closed-cell, firm, durable, excellent shock absorption, resistant to water, chemicals, and oils. |
| Polyurethane (PU) Foam | Open-cell, softer, lighter, good cushioning, and flexibility. |
| Ethylene-vinyl acetate (EVA) Foam | Closed-cell, softer and more flexible than PE foam, good shock absorption, chemical resistance. |
| Cross-linked Polyethylene (XLPE) Foam | Highly durable, rigid, resistant to wear and tear, superior protection. |
Easy to Clean Options
Drawer liners simplify the cleaning process. They prevent dirt and grime accumulation, allowing for easy removal and cleaning of the liner itself. ToolBox Widget’s Premium Drawer Liners create a moisture barrier, resist oil, grease, and other shop residues, and are easy to clean. ToolTex Premium Tool Box Liners repel water and are also easy to clean. This ease of maintenance contributes to a consistently tidy and professional workspace.
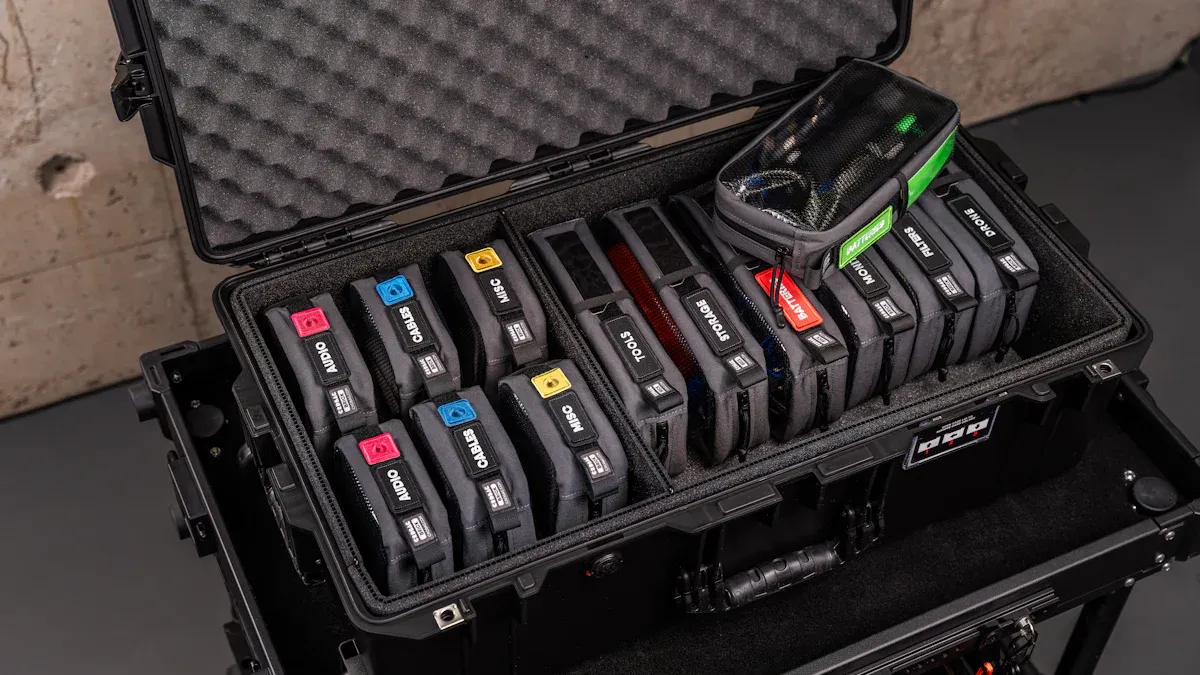
Portable Solutions: On-the-Go Tool Boxes Organization
Professionals and DIY enthusiasts often require tools at various locations. Portable solutions ensure tools remain organized and accessible away from the main workshop. These systems offer mobility and efficiency, transforming how individuals approach projects in different settings.
Tool Rolls and Pouches
Tool rolls and pouches provide flexible and compact storage for essential tools. They adapt well to diverse work environments.
Compact Storage for Specific Tools
Tool rolls and pouches offer compact storage, ideal for specific tool sets. High-strength fabrics, such as ballistic nylon, resist punctures, protecting tools effectively. Reinforced seams prevent tearing, ensuring durability. Protective liners, often made from PVC or neoprene, prevent moisture and corrosion, safeguarding tool integrity. These solutions are cost-effective, requiring a lower initial investment compared to hard Tool Boxes. Their modular pockets allow for expandable capacity, and better organization reduces tool replacement frequency. They offer versatility across various trades, featuring insulated pockets for electrical work, hammer loops for carpentry, and oil-resistant liners for automotive repairs.
Easy Transport for Small Jobs
These portable organizers facilitate easy transport for small jobs. They reduce trip hazards by keeping tools off the floor. Their design balances weight distribution, lessening back strain for users. This improves workflow by reducing the need for bending and crouching. A modular design also reduces waste and aids in inventory tracking, preventing tool loss. This promotes lean worksites by encouraging tidy tool management.
Grab-and-Go Kits
Grab-and-go kits streamline project preparation, ensuring all necessary tools are ready for immediate use.
Assemble Project-Specific Tool Sets
Individuals assemble project-specific tool sets by sorting, grouping, and packaging related items together. This practice, known as “kitting,” reduces packaging waste at the workface. For instance, a Sortimo T-Boxx offers an excellent solution for small parts, featuring clear lids, removable cups, and durable latches that prevent parts from mixing. The Milwaukee 10 Compartment Small Part Organizer is ideal for slightly larger items like hinges and eye hooks, with removable cups and the ability to latch together. The DeWalt Tough System also provides a durable, contractor-grade wheeled storage option; its small case with a top handle prevents contents from shifting during transport.
Reduce Trip Time and Increase Efficiency
By grouping parts and assemblies, workers spend less time finding and transporting necessary pieces. This streamlines field installation, reducing the number of individual items an electrician needs to handle for each task. Portable and modular systems are favored for projects across different locations within a house, allowing for quick movement of tools. Highly durable systems often come with increased weight, so balancing durability with manageable weight is crucial for portability. Top handles are essential for carrying these kits, especially those with small parts, to prevent contents from shifting.
Regular Maintenance: Keep Your Tool Boxes Tidy
Consistent maintenance ensures a tool organization system remains effective. Regular upkeep prevents clutter and preserves tool functionality.
The Five-Minute Tidy Up
A quick, routine tidy-up keeps the workspace functional and prevents disarray.
Daily or Weekly Quick Sort
Individuals should dedicate a few minutes daily or weekly to a quick sort. This routine prevents clutter from accumulating. They can wipe down toolboxes, belts, and bags regularly. This simple habit maintains cleanliness and prevents grime buildup. A consistent quick sort ensures the workspace remains ready for immediate use. This proactive approach minimizes the need for extensive cleaning later. It also helps identify any tools that might be out of place.
Return Tools to Their Designated Spots
Every tool needs a specific home. Returning tools immediately after use prevents misplacement. This practice ensures tools are always accessible for the next task. It also keeps the workspace organized and reduces search time. Maintaining a well-organized tool storage system keeps tools in good condition and easily accessible. This habit reinforces the overall organization strategy. It also instills discipline, making the entire system more sustainable.
Annual Deep Clean
An annual deep clean offers a comprehensive review of the entire tool organization system. This process ensures long-term efficiency and tool longevity.
Re-evaluate Organization Needs
Individuals should re-evaluate their organization system annually. This assessment helps identify areas for improvement. They can invest in quality storage containers and organizers. This ensures the system remains effective as tool collections evolve. Investing in a quality toolbox, cabinet, or packing system protects tools from dust, moisture, and accidental damage. They might consider using shelves or pegboards for small tools and hanging larger tools. Keeping tools off the floor also contributes to better organization and safety. This annual review helps adapt the system to changing project requirements and optimizes storage solutions.
Clean Out Debris and Reorganize
This process involves more than just tidying. Individuals should clean out debris from all compartments. They can store tools properly, covered and protected from dirt, moisture, and drastic temperature changes. Placing silica gel packs in Tool Boxes absorbs excess moisture and prevents corrosion. Utilizing rust inhibitors and anti-rust liners provides added protection. These measures are crucial for preserving tool integrity. They should store power tools in their designated cases or original packaging. This protects sensitive components and accessories. Using protective cases or sheaths for sharp tools prevents injuries and maintains their cutting edge. Storing tools in a clean, dry environment, away from extreme temperatures and humidity, prevents corrosion and rust. Consider placing a dehumidifier or additional silica gel packs in enclosed spaces to combat humidity effectively. This thorough cleaning extends tool life and maintains optimal performance, ensuring tools are always ready for demanding tasks.
Smart Storage for Specialized Tools: Beyond Basic Tool Boxes
Organizing specialized tools requires more than just basic storage solutions. These items often represent significant investments and demand specific care to maintain their functionality and longevity. Effective storage for specialized tools ensures their protection, accessibility, and readiness for any task.
Dedicated Storage for Power Tools
Power tools, with their unique shapes and accessories, benefit greatly from dedicated storage. This approach protects them from damage and keeps all components together.
Custom Cases and Bags
Manufacturers often provide original hard cases for power tools. These cases offer excellent protective packaging, ensuring safe transport and durability. For those seeking more versatile options, durable plastic bins provide substantial protection. They are stackable and often transparent, allowing easy visibility of contents. Professionals on the go frequently use tool bags, which come in various designs, including backpacks with padded handles and shoulder straps. Accessory totes are useful for multiple tools used together, especially when leaving a workstation. For a truly tailored approach, building a custom organizer allows for storage based on available space and specific tool collections. This can include open shelves, drawers, or pegboard backing.
Protect Investments and Accessories
Protecting power tools involves more than just putting them away. Users should conduct pre-storage maintenance, cleaning tools, removing batteries, and ensuring switches are off. For long-term storage, lubricating moving parts is crucial. Each tool has unique requirements; users should follow manufacturer instructions for temperature, moisture, and elemental exposure. Lithium-ion batteries, for example, require specific care: store them indoors at room temperature, away from sunlight, heat, water, and moisture, and at half charge for optimal stability. Small parts like drill bits, blades, and bolts also need sturdy containers, sorted by size, to prevent disorganization and wasted time.
Adapting to Different Tool Box Types
Various types of tool storage cater to different needs, from stationary workshop setups to mobile job sites. Choosing the right type enhances efficiency.
Rolling Chests vs. Portable Tool Boxes
Professional tool chests represent a significant investment. They are durable, often lockable, and more spacious than handheld options. These chests are typically mobile, providing an intuitive organization system for workshops. For professionals needing to transport tools, rolling toolboxes offer multiple stacked bins for different tool sizes. Portable toolboxes, often featuring cantilever trays and customizable compartments, provide flexibility for on-the-go tasks. These solutions balance capacity with ease of transport.
Wall-Mounted Cabinets and Workbenches
Maximizing floor space is essential in many workshops. Wall-mounted storage solutions like pegboards, shelves, or wall racks effectively utilize vertical space. Pegboards are ideal for small, light power tools and accessories. French cleats offer versatile hanging for cabinets, shelves, and custom holders. Rolling workbenches provide mobile storage with reinforced frames, work surfaces, built-in compartments, and integrated power strips. A dedicated charging station, whether wall-mounted or freestanding, ensures tools remain organized and charged, ready for the next project. This comprehensive approach to tool storage extends beyond a simple Tool Boxes, creating a highly efficient and protected workspace.
An organized Tool Boxes significantly transforms projects. It saves valuable time and extends tool longevity. Readers should implement these smart strategies. They will create a more productive and efficient workspace. Maintaining an optimized tool collection is an ongoing journey. Embrace this continuous process for sustained improvement and greater project success.
FAQ
How frequently should one reorganize a toolbox?
Professionals recommend a daily or weekly quick sort. This action prevents clutter accumulation. An annual deep clean helps re-evaluate organizational needs. This ensures the system remains effective.
What is the most effective method for storing small parts?
Clear lidded organizers are highly effective. They allow quick identification of contents. Small parts bins and trays also keep items separate. Stackable options maximize space efficiency.
Are foam inserts truly beneficial for tool organization?
Yes, foam inserts offer significant benefits. They create custom compartments. This prevents tool migration and protects delicate tools. They also reduce rattling and damage during transport.
How can one make a toolbox more portable for various job sites?
Tool rolls and pouches offer compact storage. They facilitate easy transport for small jobs. Grab-and-go kits assemble project-specific tool sets. This reduces trip time and increases efficiency.
What strategies help manage an extensive tool collection?
Categorization by tool type or project type helps. Maximizing vertical space with magnetic strips or pegboards is useful. Dedicated storage for power tools is also beneficial.
How does one protect tools from rust and corrosion?
Store tools in a clean, dry environment. Use silica gel packs to absorb moisture. Rust inhibitors and anti-rust liners provide added protection. Proper storage extends tool life.
What are the primary advantages of labeling a toolbox?
Clear and concise labeling allows quick retrieval. It saves time searching for tools. Color-coding systems provide visual cues. This streamlines workflow and improves overall efficiency.
Post time: Dec-05-2025